
Fixably integrates using Apple's most up-to-date REST API. Our certificate tool generates custom certificates for use with GSX.
Before setting up your GSX Integration, review the checklist to confirm you have all required information available prior to starting.
Click the links below to jump to the sections indicated:
- Accessing the GSX Certificate Tool
- Generate CSR Files
- Completing the Certificate Request
- Installing the Certificates
- Setup GSX User Settings
- Setup Shared GSX Access
- Test GSX Integration
- Configure location-based GSX settings
- Troubleshooting Common Errors
- Resetting the Certificate Tool
Accessing the GSX Certificate Tool
- Using an Administrator account, navigate to the Fixably Home Screen.
- Select your User Name Menu and then click System Settings.

- From the Settings Menu, select Integrations and then click GSX.

- Scroll down and click the Certificate Tool button.

Generate CSR Files
- Once the certificate tool has opened, fill in all fields as shown below. Then click Create Certificate Request when done.
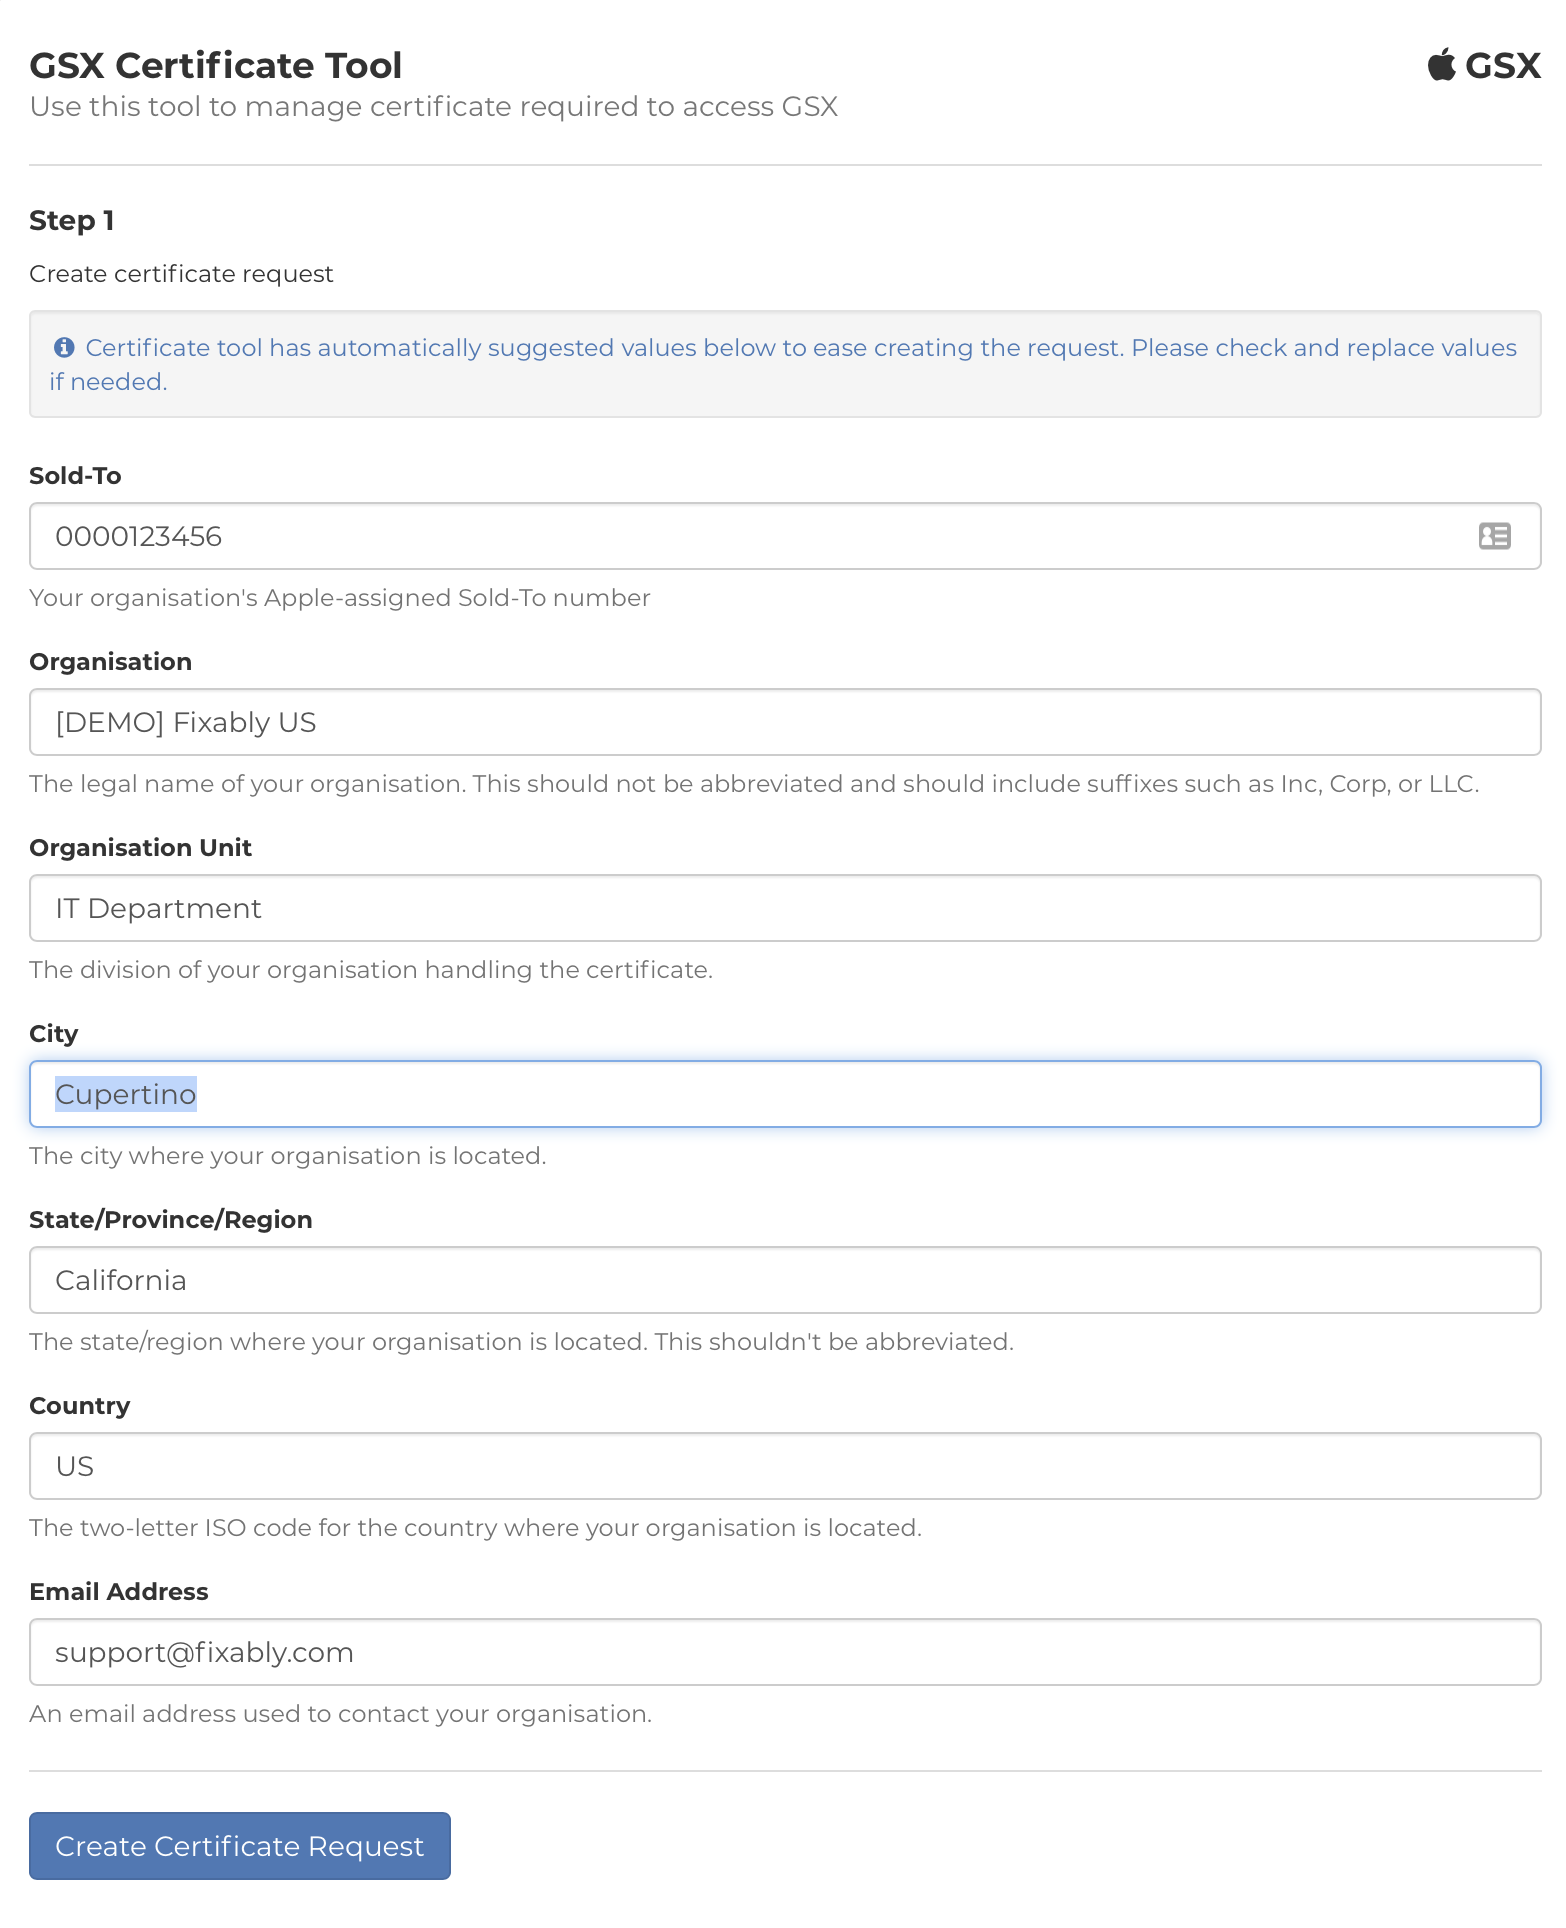
- After the information entered is validated, a certificate request file is generated: certreq_rest.csr. Click on the link to download the REST API certificate request.

- Click the email template. Follow the instructions in the template to fill out the email request. Please ensure you copy your Apple account manager, GSX admin (if you are not the named GSX Admin), and your Fixably Customer Success Manager. Make sure the .csr file you download is attached to the email.
Note: The email template will open in your default email client. Ensure to send the email from the same email address registered with GSX.
***** START OF INSTRUCTIONS
*
* 1. Attach certificate request files `certreq_rest.csr` and `certreq_soap.csr` from certificate tool to this email.
* 2. Add your gsxws@apple.com in the To field.
* 3. Add your Apple country manager in the Cc field.
* 4. Add your GSX account administrator in the Cc field (if you are not).
* 5. Remove these template instructions.
* 6. Send email.
*
***** END OF INSTRUCTIONS
Environment: Production (REST, SOAP)
GSX Sold-to account number: 0000123456
Primary IT contact’s name: [CONTACT NAME]
Primary IT contact’s email: [EMAIL ADDRESS HERE]
Primary IT contact’s phone number: [PHONE NUMBER HERE]
Primary business contact name(s) for API related communications: [CONTACT NAME]
Primary business contact email address(es) for API related communications: [EMAIL ADDRESS HERE]
Static outgoing server IP address(es) sending requests to GSX Web Services production environment: 209.50.52.238
Static outgoing server IP address(es) sending requests to GSX Web Services test environment: 209.50.52.238
Static outgoing server IP address(es) sending requests to Appointment Scheduler Production: 209.50.52.238
Static outgoing server IP address(es) sending requests to Appointment Scheduler test environment: 209.50.52.238
System design overview: [Applicable to and required for in-house/custom development]
List of API to be integrated: [Applicable to and required for in-house/custom development]
Third-party Integration Solution: Company and product name: Fixably
Completing the Certificate Request
Once you have received the completed certificate(s) from Apple, the files need to be uploaded to the certificate tool to generate certificate files that can be used with Fixably.- Navigate back to the certificate tool. Select the .pem file by clicking the document icon to the right of the field and clicking Upload when done.
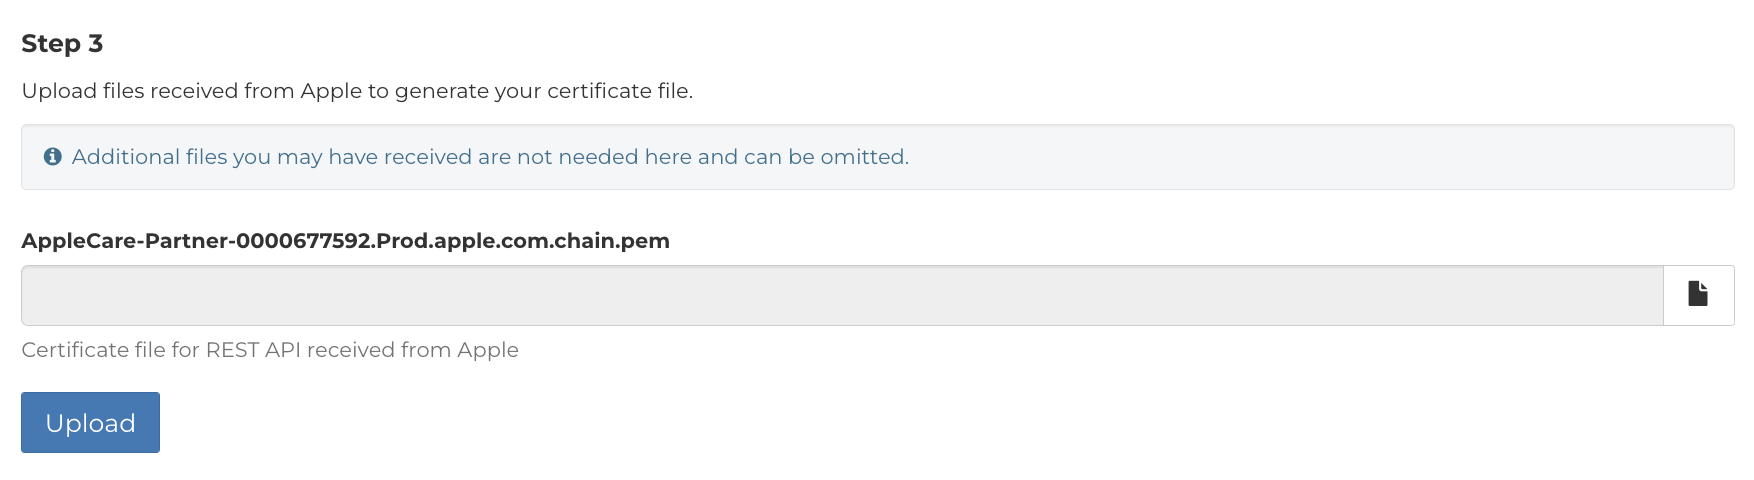
- Note: Do not rename or edit the file name. Apple supplies it in the expected format.
Installing the Certificates
- Once the certificate file is uploaded, download the .p12 certificate files from Step 4 and note the certificate passphrase.

- Navigate back to System Settings.
- From the Settings Menu, select Integrations and then GSX.
- Fill in the Sold-To and Ship-To information. Ensure the correct GSX environment is selected, typically Production. Upload the REST certificate generated in Step 3 and enter the passphrase provided.

- If you are in a locale that uses states or provinces, select the checkbox next to State used if not already checked.
- Select the Repair Types used by your business. Any repair types left unchecked will not be visible when creating a repair.

- When complete, click Save Settings.
Setup GSX User Settings
- From the Fixably Home Screen, navigate to User Settings.

- Click Expand next to the heading GSX to view user-based GSX settings.

- Enter your Apple ID and Tech ID as shown above. Generate an Activation Token by clicking the link Request new activation token by clicking here.
- Click Save Settings when done.
Note: Activation Tokens will expire and will need to be regenerated periodically.
Setup Shared GSX Access
If a User does not have personal GSX access, Fixably allows for device and information lookups by sharing GSX Accounts. Enable this feature if you use the Customer Portal or have internal staff who may not have a personal GSX account.
- Navigate to System Settings/Integrations/GSX Accounts.
- Click the disclosure triangle next to the user's account you want to share. Then click Share this account.

- If your business has multiple Locations, make sure that the Shared Account has access to all locations in Apple MyAccess.
Test GSX Integration
Once all settings are configured, the last step is to confirm that Fixably correctly communicates with GSX.
- Navigate to System Settings/Integrations/GSX.
- Next, click Test Connection to launch the Integration Tester.

- Review the status beside each connection step.
Configure location-based GSX settings
- Navigate to System Settings/Locations.
- Click on the Location name.
- Enter the GSX Sold-To and Ship-To numbers in the fields provided.

- When complete, click Save.
Troubleshooting Common Errors
- Error:1. Sold-to is set, Invalid or missing sold to number.
- Confirm the correct Sold-to number has been entered in Step 4. Retry the test after validating the Sold-to number.
- Error: 2. Environment is selected. Invalid or missing environment setting.
- Confirm the correct environment setting is configured in Step 4. Typically this should be set to Production unless otherwise instructed by Fixably Support.
- Error: 3. Certificate is uploaded. Certificate is missing.
- The certificate file from Step 3 is either invalid or missing. Confirm the correct certificate has been uploaded and the passphrase is correct.
- Error: 4. Testing connecting to GSX server in Test Connection.
- This typically occurs because Apple has not whitelisted Fixably's IP addresses. Contact the GSX Web Services team to verify the whitelisting request submitted in Step 2.
- Error: 5. Test authentication using a shared GSX account.
- There is not a user configured for shared GSX. Navigate to System Settings/Integrations/GSX Accounts to enable at least one shared account.
- Error: Activation token is invalid. A new one must be requested.
- This can occur because the user's Apple ID does not have web services permissions assigned. Verify via MyAccess that the correct permissions have been assigned and then request a new activation token.
Resetting the Certificate Tool
- If a new certificate is required or if you are instructed to do so by Fixably support, Administrators can reset the certificate tool by clicking Reset this tool.

- This action irreversibly deletes all stored data from the certificate tool.
- Be sure to download and save any certificate files and passphrases in a secure location before resetting the tool.
Change Log

2022-08-18 - Removed references to legacy SOAP API. New screenshots.
2022-03-10 - Article update with new screenshots and copy edits
2020-12-10 - New Article